Loading...
Loading...
Loading...
Loading...
Loading...
Loading...
Loading...
Loading...
Loading...
Loading...
Loading...
Loading...
Loading...
Loading...
Loading...
Loading...
Loading...
Loading...
Loading...
Loading...
Loading...
Loading...
Loading...
Loading...
Loading...
Loading...
Loading...
Loading...
Loading...
Loading...
Loading...
Loading...
Loading...
Loading...
Loading...
Loading...
Loading...
Loading...
Loading...
Loading...
Loading...
Loading...
Loading...
Loading...
Loading...
Loading...
Loading...
Loading...
Loading...
Loading...
Loading...
Loading...
Loading...
Loading...
Loading...
Loading...
Loading...
Loading...
Loading...
Loading...
Loading...
Loading...
Loading...
Loading...
Loading...
Loading...
WorkSpaces Manager has three main sections for users and administrators to manage the the Portal:
USER section: this is the user self-service portal that allows to manage your own WorkSpaces(s) and execute admin defined basic actions.
ADMIN section: provides an overview of all the WorkSpaces environment, along with an audit of actions carried out by portal admins and recommendations made.
CONFIG section: to configure the WorkSpaces Manager appliance and add/remove features that users and administrators have permissions too.
WorkSpaces Manager provides a full Amazon WorkSpaces management portal. Containing a user self-service and an administration portal in a browser-based environment, without using the AWS Console.
WorkSpaces Manager is deployed as an appliance from the AWS Marketplace as an EC2 instance. It can be also deployed as a Packer AMI onto AWS. More information in the Installation section.
This guide has been authored by experts at Nuvens to provide information and guidance on using WorkSpaces Manager at full capacity. Product highlights:
WorkSpaces Environment Management with optional application self-service feature for domain group-based application deployment
Task driven User & WorkSpaces provisioning
Multi-AWS Account and multi-region
Forest-wide and Multi-Domain
Automatic reboot schedule defined on a per WorkSpaces basis
Cost reporting and Cost Optimisation
WorkSpaces Performance Monitor Agent to report on Processor, Memory, Disk and connection statistics
The User self-service portal that allows a user to manage their own WorkSpaces(s) and execute admin defined basic actions.
End-Users can save time and reduce support tickets by accessing the WorkSpaces Manager User Portal.
This portal shares the same URL as the one used by WorkSpace Administrators but provides end-users with a simplified version tailored to their specific WorkSpaces. Users can log in using their existing credentials.
The self-service Portal can save a user from calling the Service Desk if they cannot connect to their WorkSpace or they can stop/restart their WorkSpace without any intervention from Support.
If enabled, the "User Restore" and "User Rebuild" options will also be available in the portal.
New Feature: Users now have the ability to change their WorkSpace reboot hour, offering greater flexibility to align automated maintenance with their working patterns or preferences.
When this option is enabled, and the service account has the necessary permissions in the LDAP Active Directory, users can change their passwords directly within the portal. Password security requirements can be configured in the settings menu to align with corporate standards. Additionally, if enabled, users will receive an email with a link to the WorkSpaces Manager portal 10 days before their password expires.

The Support toolbar contains the following options;
Documentation - The admin guide for WorkSpaces Manager will open in a second window.
Service Log (Text File) - May be requested if support is needed.
Audit Log - An audit trail of users on WorkSpaces Manager and automated tasks carried out.
Error Log - Detailed Error Log.
All Logs - List of All Logs that include Audit, Info, Warning, Error and Critical.
Configuration Status - Status for Accounts and Directories in WorkSpaces Manager.
In the WorkSpaces Pools tab, you'll find a overview of the pools in your AWS account displaying information of the usage and cost. You also have a graph showing the active WorkSpace Pool sessions for all the pools. A dropdown on the right of each pool gives you options to view active sessions and monthly user usage on that specific pool.
Further down the page you will see the latest logs for WorkSpace Pools.
Active Sessions will display any connected and not connected users with timestamps of the sessions
Session Usage provides insights into usage patterns across daily, hourly, and monthly intervals. It also includes a chart that visualizes the hourly efficiency of session provisioning, helping identify peak usage times and optimization opportunities.
In Secure Browser you will see a dashboard for WorkSpaces Web. It provides an overview of activity and usage including portals, users, active sessions, latest logs, url's visited, total cost in reporting period and user hours in report period.
In this section you will be able to view your WorkSpaces Manager Licensing information which consists of the following:
Version
Maximum Licenses
Licenses In Use
License Expiry
If an upgrade is available, an upgrade icon will appear. Clicking on it will take you to the update page, where you can download and install the latest version of WorkSpaces Manager.
This section contains the configuration for the Portal settings, OpenID Connect and Microsoft Entra Settings.
Portal: used to configure how the portal manages network settings, activity reporting, and logging.
OpenID Connect Settings: for integrating the portal with an OpenID Connect provider (for single sign-on 'SSO'), enabling secure and streamlined user authentication.
Microsoft Graph (Entra) Settings: for integrating the portal with Microsoft Entra ID to enable directory integration via Microsoft Graph API. This allows the portal to retrieve user and group information by authenticating through an Entra-registered application with the appropriate API permissions (User.Read.All and Group.Read.All).
Self Service: provides various options for user self-management, such as changing passwords, restoring accounts, migrating data, and rebuilding configurations.
In this section, you can configure the credentials for Remote Access, compatible with both Microsoft RDP and Dameware
This is the generic account used for connections across your organization. You can remotely control a user’s WorkSpace using the preferred application from the available list.
Enable RDP: enables the option for downloading an RDP file to connect to the user’s WorkSpace from within the Portal.
Enable DameWare: this is the toggle to switch on and off your preferred shadowing software.
The dashboard provides a unified view of the entire WorkSpaces environment and estate. It also displays event logs, serving as an audit trail of actions performed by administrators.
In the centre of the dashboard:
Unhealthy WorkSpaces
WorkSpaces Manager Performance Monitor and CloudWatch Log Group are required to extend the available metrics beyond the default ones provided by AWS.
If the WSM Performance Monitor agent is installed, you can view the CPU and memory usage of the user's WorkSpace. The available disk space for the root and user volumes is displayed regardless of whether the agent is installed.
User Location
You can view the approximate location (based on the ISP provider) of a user by selecting the "User Location" Tab.
User last login times and dates
You can view user activity times and dates of a user by clicking on Activity. Clicking "Export All" allows you to download a CSV file containing the full user activity log for the selected WorkSpace.
Processes
The Users tab displays user attributes from the Active Directory domain.
Only users with an email address in their attributes are visible, as this is required to provision a WorkSpace.
From the main menu, one action can be performed with the Users:
Additionally, when viewing a user's information and attributes, several other actions can be executed, such as:
This tab displays the status of WorkSpace and user account creation. The update job runs every 10 minutes, so it may take a few minutes for the status to reflect changes in the next update cycle.
The list is fully searchable by the contents of any column and also includes tasks such as scheduled WorkSpace terminations.
The Update section allows you to refresh data from various APIs and repositories. You can select specific elements to force an update of their contents. Depending on the size of the estate and the update request, this process may take up to 20 minutes. A success message will be displayed upon completion.
The following elements can be updated:
WorkSpaces
WorkSpaces (Full)
On the Insights page (previously Reports) there are a variety of reports available grouped into four key section for easier navigation to help you understand costs and user behavior within your AWS WorkSpaces estate.
The following reports that are currently available are as follows:
WorkSpaces Secure Browser provides a protected environment for users to access private websites, software-as-a-service (SaaS) applications, and the public internet. WorkSpaces Secure Browser works with the browser running locally on the end-user’s device.
To enable WorkSpaces Secure Browser and set up logging, start by navigating to the WorkSpaces Manager console and toggling the Enable Secure Browser setting to "On" to display it in the menu. Next, create an S3 bucket by going to the Amazon S3 Console and setting up a bucket with a name like workspacesweb-userlogs. Note down the bucket name for later use. Proceed to the Amazon Kinesis Console first create a data stream starting the name with amazon-workspaces-web- and set Capacity mode to On-demand, click Create data stream.
Then go to WorkSpaces, under the drop down for WorkSpaces Secure Browser go to Portals and click the active Portal for WorkSpaces Web. Select Portal settings then edit nect to User access logging details and select the Kinesis data stream.
If you are in an organisation where every new user will automatically be assigned a WorkSpace, you can assign them one from within WorkSpaces Manager. WorkSpaces Manager can also seamlessly integrate with your joiners and leavers software such as ServiceNow.
If you are doing this yourself, there are four ways of creating a user a WorkSpace: • • • • •
This section displays a list of all WorkSpace Directories in the AWS account, including AWS Directory Services and AD Connectors. As usual, the search option allows you to filter the content.
We can also test the AD Service with the Button
This action generates a report that includes best practice notes, detailed information, and test connections for creating and deleting Users and Computer Objects
If the action times out or returns an error, there may be an issue with the credentials or connectivity.
Under what scenarios modify, create or delete actual user objects? It can create users only.
Under what scenarios does WSM modify, create or delete actual user groups? It only modifies user groups to remove a user when a workspace is terminated after being created via an AutoProvision profile.
Under what scenarios does WSM modify, create or delete computer objects? It modifies the description of a computer object to add the friendly name when the option is toggled on in settings. Objects are created by Amazon during workspace creation. We only remove the computer object when the option is toggled on in settings, otherwise it is orphaned. At this point we only list orphaned objects but do not manipulate them.
If you want to create a new user in Active Directory which is copied from an existing user (which will also copy all their AD groups) and create a WorkSpace for them at the same time, firstly search for the user that you want to copy in ‘Users’.
Then select the copy button next to the user you want to use as a copy template. You can see at this point; this user has a WorkSpace and you can perform various actions. In this case, click Copy WorkSpace button.
You will then see a screen to enter the information for the new user, choose the running mode, and select encryption for the WorkSpace. Once completed, click 'Save.' The task will be added to the Task Queue, which you can view from the menu. Once the task is complete, it will disappear from the list. If selected, the user will also receive an email notification confirming that their WorkSpace has been set up.
In the WorkSpaces Personal tab, you’ll find a list of all existing WorkSpaces along with some of their attributes. This list is fully searchable by any of the information displayed in the columns. Some searchable elements include; Region, Computer Name, WorkSpace ID, Production/StandBy, Reg Code, Username, Name, IP Address, Compute, Mode, State, Directory, Protocol, Agent
By clicking on a WorkSpace, you’ll be directed to the , where you can view detailed information and performance metrics, as well as perform a variety of tasks.
Configure the "Domain Password Policy" Email and Password text that users receive from the system when their password is to expire if the option is enabled for Password Expiry Emails.
Lists all the regions configured for the account and whether the AppStream service is available in them. This list is fully searchable by part searches on the contents of any column.
In WorkSpaces Manager, Roles define a set of permissions that can be assigned to advanced users or administrators. Custom roles can be tailored to specific needs, such as the actions that can be performed or restrictions based on locations, for example.
To add a new role, select the ‘Action’ button in the top right. In this example, we want to create a role that only grants the ability to restart, stop, and start a user’s WorkSpace. After selecting the desired actions, click ‘Save’. You can modify the role at any time by double-clicking on it and saving the changes.
The Active Directory Groups section allows administrators to validate AD Groups in order to map to WSM roles. This ensures users are granted the correct permissions and access levels within WorkSpaces Manager based on their group membership in Active Directory.
You can create new roles by using the Create Role button, there you enter the name of the AD group you want to use and click validate
To set up mapped roles, please follow the steps outlined on the page.
The Simple Mail Transfer Protocol (SMTP) is a technical standard for transmitting electronic mail (email) over a network.
This section allows you to configure an SMTP relay to send emails to users and administrators when certain actions are triggered.
We recommend using AWS Simple Email Service (SES) to create an SMTP Relay of your own. You can use a domain (nuvens.cloud) or a subdomain (mail.nuvens.cloud), aligned with your strategy. You can then test the connection by clicking Validate Configuration button highlighted above.
To configure SES, follow the steps outlined on the page in the installation manual.


Healthy WorkSpaces
Standyby WorkSpaces
Stopped WorkSpaces
Unused WorkSpaces
Connected Users
Portal Licenses (in percentage of use)
Always On
AutoStop
Disabled Users Account
Orphaned (WorkSpaces)
API Rate Exception
Recently Disconnected
Recommendations
WorkSpaces Low Disk Volume
CO Directories (Cost Optimizer)
SQL Disk Space
WSM has a auto-fix for Amazon WorkSpaces. However, in a very small amount of cases, AWS Support will be required to fix these and these will be shown under the Unhealthy WorkSpaces tile.
When available disk space drops below 10% on the WSM SQL database, a SQL Disk Space Warning tile is shown to alert administrators.


Orphans
Directories
Check Tags
AutoStop Timeout

Cost Optimization
Cost Summary
Underprovisioned
Overprovisioned
Unused WorkSpaces
UnHealthy
Stopped
Orphaned WorkSpaces
Orphaned Computer Objects
Recommendations
WorkSpace Tag report
WorkSpaces Clients in Use
Bundle/Image in Use
WorkSpace Service Limits
Hour Since Reboot
WorkSpace Provisioning
WorkSpace User Locations
High Resource Usage
Disabled Users
Low Disk Space


You can view the top 5 active processes on the WorkSpace that exceed resource usage thresholds. Clicking a process name opens a detailed view of its usage history.
In-Session Latency
This shows the in-session latency of the session over a defined period.


Back to the Kinesis dashboard and go to Amazon Data Firehose, create a Firehose stream Set the source to Amazon Kinesis Data Streams and the destination to Amazon S3. In the Source Settings, click Browse and select the Kinesis Data Stream that was created.
Then, in the Destination Settings, click Browse and choose the S3 bucket you just created. Once done, click Create Firehose Stream to complete the setup.
Finally, return to the WSM console, and in the configuration, add the Bucket Name, Account ID, and Region, then click Add to finalize the integration. This will complete the setup for enabling and logging WorkSpaces Secure Browser activity.


In the WorkSpaces EC2 tab, administrators can view and manage EC2-backed WorkSpaces instances. The interface displays a summary of each instance, including its state, region, current user, IP address, compute type, and any applied schedule.
Each instance can also be opened in more detail by clicking its name. This brings you to the Instance Details page. Here you can view real time CPU and Memory Utilisation, check the availability of root and user volumes, and access additional metadata such as account ID, availablity zone and public/private IPs. You can also view, add or remove tags as needed.
To view real-time metrics the WSM Performance Monitor agent must be installed on the instance. Without the agent data will not be available in the Instance Details view.
You can also adjust scheduling by editing the EC2 Schedule, This allows you to define specific working hours (e.g., weekdays 09:00–19:00) to control when instances automatically start and stop. To configure this, simply click Modify Schedule on the instance. Scheduled automation like this helps optimize performance and reduce unnecessary costs by ensuring EC2 instances only run when needed.
This is the main setup page. Key entries have already been populated during installation and initial setup.
The top section provides a summary of essential system information, such as the version and licensing details. You can view the WorkSpaces Manager version (including any available updates), the number of licenses procured, the current number of licenses in use, and the license expiry date.
The settings page is divided into the following parts:
)
Active Directory is a directory service that supports LDAP (Lightweight Directory Access Protocol), developed by Microsoft for Windows domain networks.
In this section, we must configure the information about the Directory Service and the service account used to execute operations on it. The main part is set during the first setup, asking for the following information:
Directory ID: Automatically populated once created.
NetBios Name: A shortened version of the domain name, typically up to 15 characters. Example: CLOUD.
Fully Qualified Domain Name (FQDN or DNS Name): The complete domain name that includes both the hostname and the domain. Example: NUVENS.CLOUD.
Default OU: The default Organizational Unit (OU) for user accounts in Active Directory, provided in LDAP format using a distinguished name (DN) structure. Example: DC=nuvens,DC=cloud or OU=Sales,DC=nuvens,DC=cloud.
Service Account: A specialized account for running services, applications, or scheduled tasks in an Active Directory Windows environment. It should have the required permissions for WSM to interact with Active Directory and may need to follow corporate naming conventions. Example: ad.service.
Service Password: Critical for maintaining security, especially since service accounts typically have elevated permissions.
Cost Optimizer Bucket: The name of the S3 bucket where the Amazon Cost Optimizer for WorkSpaces management tool stores its data.
Dry Run Mode: A feature that simulates potential cost-saving actions without applying them.
Active Directory Integrated: Enhances network and management capabilities by leveraging the security and replication benefits of Active Directory integration.
Once saved, you can test the successful configuration of the directories with the section
Multi Domains (Active Directory)
On initial setup, and by default, you will be able to add only one domain. However, we can enable multiple domains by enabling the feature below in Active Directory. You can see additional guidance .
Once the Multiple Domains option for Active Directory has been enabled, additional configuration elements for the Forest can be defined, such as:
Forest Service Account: A service account used within the context of an Active Directory forest, which is the top-level structure for managing a group of domains that share a common schema, configuration, and trust relationships.
Forest Service Password: This password secures the Forest Service Account, which typically has elevated privileges across multiple domains. The security of this password is crucial due to the account's high-level access within the forest.
Preferred Domain: Refers to the primary or most authoritative domain in the forest, typically used for managing resources, services, and administrative tasks across the entire forest.
The WorkSpaces (EC2) settings page allows administrators to enable and manage EC2 backed WorkSpaces.
To configure a WorkSpaces EC2 instance, click on Add Instance Definitions. This takes you to the page where you can enter all the required details for your EC2 WorkSpace setup—including:
Friendly Name for easy reference
AWS Instance Type (e.g., t3a.xlarge)
KeyPair Name, AMI ID, and Subnet ID
Security Group, Account ID, and Region
The Add Schedule Definition feature allows administrators to define automatic start and stop times for the EC2-based WorkSpaces, helping to optimize cost and resource usage. You can create custom schedules by setting stop and start times for weekdays, Saturday, and Sunday individually.
For example, a schedule like "Mon–Fri Stop at 5pm" ensures that EC2 WorkSpaces are shut down at the end of the workday—reducing compute costs without requiring manual intervention.
Once the custom KMS Keys has been enabled from: Config > Settings > Amazon Web Services
Enable Multi-Domains from: Configuration > Settings > Active Directory and tick on “Multiple Domains”
The KMS Keys will now display for the same account in which the WSM is deployed:
In a multi-accounts scenario in AWS, you need to change the policies attached to the role in the secondary (or more) accounts and specify to WSM which role to use in each case. This is done in two different places: 1) In the secondary account in which you assign permissions for KMS to the existing role. 2) In WSM, for each account with WorkSpaces that are monitored, the role to assume has to be explicitly specified.
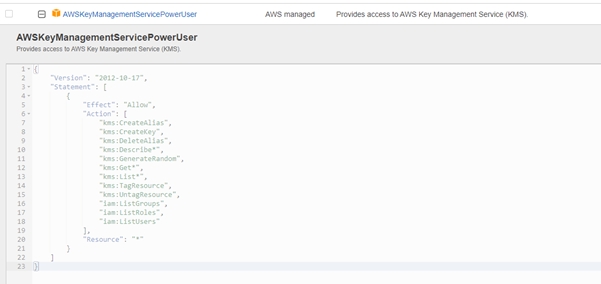
In the secondary account (and more if needed), a role like arn:aws:iam::222222222222:role/AllowWSMAccess will be edited and an AWS Managed Policy called “AWSKeyManagementServicePowerUser” will be added:
In WSM, you need to add the role that you are to use from a different account:
Before you can map Active Directory (AD) groups to roles in WorkSpaces Manager, you first need to create and validate the AD groups. You can do this by following the instructions on the Active Directory Groups Page.
Now the Groups have been validated we can now map to Roles to create WSM Role. Go to Security > Roles and click Create Role, enter a Name and click Create.
Once the role has been created, click on it to open the configuration page. In the top-left corner, you'll see the "AD Group Mapping" dropdown. From there, select the Active Directory Group you want to associate with this role.
Next, define the permissions for the role. For example, in this case, we're assigning the WSMTest AD Group and granting users access only to the Admin and WorkSpaces tabs. This ensures users in that group have restricted, role-specific access when using WorkSpaces Manager.
Users who belong to the mapped Active Directory group will automatically have the assigned role applied to them in Portal Users within WorkSpaces Manager.
When users log in to the portal, they will authenticate using their Active Directory credentials (e.g., Domain\username). Once logged in they will only see the sections and functionality that correspond to the permissions assigned to their mapped role.
Refer to the example below to see how these role-based permissions are reflected in the user interface.
If you need to patch WorkSpaces and ensure they are running at a specific time, you can now schedule the start of stopped WorkSpaces set to 'AUTO_STOP'.
To do this, select the bundle, choose the desired date and time for them to start, and click 'Schedule.'
If you want to stop all stopped WorkSpaces, regardless of bundle, simply click the button next to 'Start All Stopped WorkSpaces.
You can enable Auto-Provisioning of WorkSpaces by adding users to an Active Directory group and configuring WorkSpaces Manager to read users from that group. To start, select Add Profile.
The following information is required to create and configure an AP Profile:
AD Group Name: Populate the Active Directory group.
Region: Select the AWS Region for the WorkSpaces to be created in.
Directory: Select the WorkSpaces directory (AWS Directory Services or AD Connector).
Bundle: Select the WorkSpaces bundle.
Account: Select the AWS account number that the WorkSpaces will reside in (when multiple).
Mode: Select the desired running mode.
Encryption: Select to enable\disable root and user volume encryption
Tags: Choose the Profile Tags to be added automatically.
You will only be allowed to add "Fixed Tags" in Profile Tags once you’ve saved the Auto-Provision profile. If you go back to edit this profile, you can then add the Fixed Tags.
If Auto-Provision is enabled, the service will poll the Active Directory groups every 15 minutes for new members.
Removing a user from the AD group will not terminate the WorkSpace.
It is important to obtain consistency when manually tagging WorkSpaces. You can achieve this with the fixed tagging functionality. This option is not seen by default, unless specifically enabling it on Configurations > Settings > Amazon Web Services -ACCOUNT SETTINGS
To be able to assign tags to WorkSpaces, the Portal Administrator needs permission to do so via a Role. Roles can be accessed in the portal under (Security > Roles). SuperAdmin permissions have this permission by default. In the Role sample below, you can see that the role assigned to an administrator only allows them to add tags.
After enabling it, add which tags are going to be mandatory and possible values for it in; Configuration > Fixed Tags.
You can now add a fixed tag to a user’s WorkSpace. Navigate to a users WorkSpace in the portal. Select "Manage Tags" from the menu.
The Resources section allows to configure some elements of the Amazon WorkSpaces service like:
Administrators are granted permissions to perform advanced actions to manage the broader WorkSpaces estate. In WorkSpaces Manager, these permissions can be granularly assigned to Portal Administrators for specific tasks.
This section allows the delegation of support roles, enabling different users to access the WorkSpaces Manager console with specific administrative rights. For example, you may assign two staff members to manage users with critical roles, where policy dictates that only they are authorized to change the reboot times for those users' WorkSpaces.
Before proceeding, ensure that the Roles section includes an Administrator role with full permissions set up.
Adding a new Administrator
To add a new Portal administrator, click the icon on the right and select Invite User.
Enter the user's email address. An invitation email with a registration link will be sent.
The user must complete the registration process and confirm their email.
Once the registration is confirmed, go to the Portal Users page. Click on the new user and assign a role either the SuperAdmin role or a custom Admin role you’ve created.
Restricting users to Accounts, Regions or Directories
For support role delegation, you may want to restrict Portal Administrators to managing WorkSpaces in specific AWS Regions (e.g., a Support team in APAC), specific WorkSpace Directories (e.g., directories containing only Finance and Marketing users), or based on WorkSpace Tags (e.g., where the Department is 'R&D').
With this Admin Role, we've restricted the assigned users to managing WorkSpaces in the eu-west-1, eu-west-2, and eu-central-1 regions, within a specific WorkSpace Directory, and any WorkSpaces in the assigned AWS Account (with multiple options if Multi-AWS accounts are set up). They cannot manage WorkSpaces outside of these parameters (e.g., they cannot terminate or reboot a WorkSpace in us-east-1). You can add or remove Accounts, Regions, and Directories by clicking the bin icon next to them.
It’s important to note that Directories take precedence over Regions, and Accounts override both Directories and Regions.
The WorkSpaces Manager Status dashboard provides a view of the operational status across AWS accounts and directories. On the left, under the Accounts section, each AWS region is listed with real time health indicators for key services: WorkSpaces, S3, and CloudWatch. A green dot signifies that the service is correctly configured and operational in that region.
On the right, the Directories section details associated Directory IDs, Name, and Status per region. This view helps ensure that the configured directories are properly integrated and functioning as expected across different regions. The consistent green status icons confirm successful connections and service health across all listed components.
WorkSpaces Pools provide non-persistent virtual desktops for users who need access to highly-curated desktop environments hosted on ephemeral infrastructure. To display WorkSpaces Pools in the menu, you will need to toggle the Enable WorkSpaces Pools setting to on.
The thresholds shown in the WorkSpaces Pools settings allow you to proactively monitor disk usage on pooled WorkSpaces and receive visual alerts like below on the WorkSpaces Pools tab when free space drops too low.
This section displays all WorkSpace images in the AWS account, both custom and default. The list is fully searchable by partial matches on any column's contents.
You can easily copy a WorkSpace image to another AWS region directly from the image details screen. To do this:
Click on the image you want to copy.
In the top-right corner, click the three-dot menu and select "Copy Image."
Fill out the new image name and provide a description.
Select the destination region from the dropdown list.
Click "Copy Image."
Once submitted, you’ll receive a message confirming the image is being copied and a email once copy has completed. This is useful for maintaining consistent WorkSpace configurations across multiple AWS regions.
If your user already has an account in Active Directory, search for their account in ‘Users’. Select the domain that you are searching if you are using multi-domain.
As with any account you want to assign a WorkSpace to, it must have an email address associated with it. If an account has no email address, it will not show up in this search.
Select the user and WorkSpaces Manager will show you if there is no WorkSpace for the user. Click Create WorkSpace.
Now select the AutoProvision Profile and click Save to create the WorkSpace. You will see confirmation in the top right when creation has started and you will see it in the Task Queue.
By far the most popular method of creating WorkSpaces is using the Auto-Provisioning (AP) Profile.
To set up an AP Profile, navigate to Configurations and then AP Profiles
Select ‘Add Profile’.
Now type in the Active Directory group, select the AWS Region for the WorkSpaces to be created, select the WorkSpaces directory, select the WorkSpaces bundle, select the AWS account number that the WorkSpaces will reside in, select the running mode and then select to enable\disable root and user volume encryption. Then press ‘Save’.
If Auto-Provision is enabled, the service will poll the Active Directory groups every 15 minutes for new members.
The Customise button on the right of the page allows the administrator to configure the tiles they would like displayed.
Below we have selected to see a few options, but not all. This is highly configurable by the user in question to fit their needs.
The options chosen will be available as tiles in the main Admin Dashboard explained before:
In this section, you can configure settings for WorkSpaces (Personal) in the WSM interface.
General Settings settings that control update frequency and core enablement options.
WorkSpaces: Enable/Disable AWS WorkSpaces.
WorkSpace Update Frequency: Automatically update the local database with up-to-date information at regular intervals.
In order to verify that WorkSpaces Manager can has access to multiple account’s resources, we will need to use the AWS CLI.
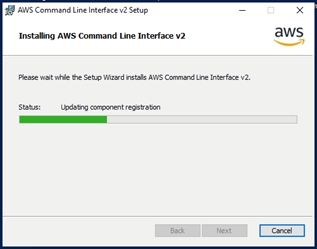
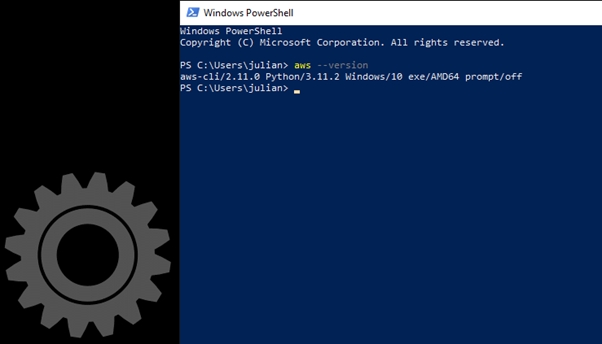
First, proceed to install AWS CLI v2 on the WorkSpaces Manager server. Process is fully defined here (). For Windows, from a Powershell session with admin rights, run:
msiexec.exe /i https://awscli.amazonaws.com/AWSCLIV2.msi
This will take 2-3 minutes to complete following the assistant:
To confirm the installation, from a new command-prompt or Powershell session, run command:
aws ‑‑version
Since WorkSpaces Manager has an EC2 role assigned that grants some permissions on it, from a new Powershell Window, we will run the command:
aws s3 ls
First, sign in to the Microsoft Entra admin center and navigate to Enterprise Applications under Applications. If you don’t already have one, create a new application. Once created, assign the required API permissions: User.Read.All and Group.Read.All by going to Permissions under Security.
Be sure to copy and securely store the client secret value immediately after creating it, as it cannot be viewed again once you leave the page.
Email templates can be managed through this interface, which also supports dynamic variables for customization.
Email templates enable custom communication between the WorkSpaces Manager appliance and users or administrators via email. You can use various dynamic variables to compose personalized messages.
There are currently a total of 6 templates:
Amazon WorkSpace Termination Scheduled
Amazon Temporary WorkSpace Termination Scheduled
Single vs Multiple AWS Account
WorkSpaces Manager allows to manage WorkSpaces across single or multiple AWS accounts. When you set up WorkSpaces Manager, you will initially set up a single account. Afterwards, you can set up multi-AWS accounts by enabling this function and following the .
Additionally, the following settings can be configured in this section:
Default AWS Region: This is the region automatically selected for running AWS services and resources unless a different one is specified. AWS regions are globally distributed locations where AWS data centers are hosted.
Show AWS Bundles: AWS WorkSpaces provides several predefined bundles that include compute resources, storage, and an operating system for provisioning virtual desktops. It is recommended to hide these default bundles to make custom bundles more visible and easily identifiable.
On initial setup, and by default, you will have one domain. You can enable multiple domains by enabling the feature below in AD settings.
When Multi Domain is enabled, you can add more directories.
AD Service Account and password: When creating the AD Service Account to support AWS WorkSpaces you will have already provided an account with permissions to create computer objects within AD to the OU specified at the time. We recommend using the same service account and providing additional permissions to delete computer objects.
NetBIOS name: NetBIOS name of the domain that your WorkSpaces will be joining.
FQDN: Fully Qualified Domain Name of the domain that your WorkSpaces will be joining.
Default User OU: If you create a user in the ‘Add User’ section of the Portal, this is where it will place that user. If you use the ‘Import Template’ then you can specify where you want the user(s) to be located per OU or by copying template users.
Open the WorkSpaces Manager console and go to Configuration > Settings > Enterprise, then scroll down to the Microsoft Graph (Entra) Settings section. Enable Microsoft Graph and enter the Tenant ID, Client ID, and Secret. See for more information.
Create a group in Microsoft Entra—e.g., TempProvisionEntra—to be used for temporary provisioning. Moving forward, add users to this group to automatically trigger the provisioning process.
To ensure proper synchronization, user accounts should be initially created in on-premises Active Directory—not in Microsoft Entra.
To set up Auto Reboot, start by creating a fixed tag. Go to Configurations > Fixed Tags, click Add Tag Name, and enter RebootHour as the tag name, then click Save.
Next go to the WorkSpaces Personal tab and select the WorkSpace you want to configure. Click the settings icon in the top right and choose Manage Tags.
In the tag dropdown, select the RebootHour tag you just created. Then, in the value field, enter the time you'd like the automatic reboot to occur—for example 7AM. Make sure to include AM or PM in the value field. Once done, click Save.
Disable Delete Computer Object: This feature prevents the deletion of computer objects in Active Directory when associated WorkSpaces are deleted, which could otherwise leave orphaned objects in the LDAP directory.
Disable LDAPS: This disables LDAP over SSL, preventing encrypted communication if LDAPS is not implemented or enabled in the target domain.


To avoid unnecessary API calls it is recommended to set frequency to 90 mins
Auto Provision: Enable Auto-Provisioning of WorkSpaces via Active Directory groups.
Auto Provision Frequency: Define polling interval for auto-provisioning. This checks the AD groups in your AP profiles at specific time periods.
Lifecycle Management automate behavior based on activity, duration, and workspace state.
Use Global AutoStop Time: Sets a global time for auto-stop all the WorkSpaces in this mode.
AutoStop Timeout: Set idle time (hours) before WorkSpaces are auto-stopped.
AutoDelete: Enable automatic deletion after a defined duration.
AutoDelete Days: Set number of days before a WorkSpace is deleted.
AutoDelete Safety Days: Grace period after scheduled deletion.
AutoStop on AutoDelete: Automatically convert an Always-on WorkSpace to Auto-stop.
Simulate AutoDelete: If enabled will simulate a deletion in the service logs.
Rebooting & Resiliance control system rebooting behavior and regional fault tolerance.
Auto Reboot: Enables the Auto Reboot function.
Unhealthy Reboot: If enabled, the service checks every 10 minutes for WorkSpaces marked as Unhealthy. If still unhealthy upon recheck, they are rebooted or moved off the hypervisor.
Auto Reboot Tag Name: Specify a custom tag name to define the scheduled reboot time for WorkSpaces. For configuration steps, visit Auto Reboot Setup.
By default Auto Reboot will happen at 3am
Multi Region Resiliance: Only enable this if you have configured Multi Region Resiliance, Associates secondary WorkSpace for primary.
Remove Standby on Termination: Determines if standby resources are automatically terminated with the primary WorkSpace.
Identity & Display customize how user identity is displayed on the WorkSpaces.
Display Real Name: Show real name for user in System.
Display Username: Shows the username on WorkSpaces.
Storage & Security manage volume encryption and resource thresholds.
Disable Volume Encryption By Default: To use non-encrypted volumes by default, enable the option to disable encryption.
Volume Space Alert Threshold (%): Alert if root/user volume usage is too high

From Version 5.4 onward, if you want to configure KMS Keys by default for encrypting WorkSpaces, the “Multiple Domains” setting must be ticked, so that the directories are listed.


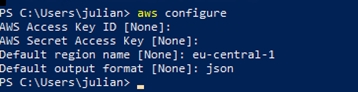
For this to be tested on multi-accounts, we need to modify the .aws/credentials file on our profile by running command:
aws configure
A menu will ask for some details: AWS Access Key ID: keep blank AWS Secret Access Key: keep blank Default region name: use yours (in our case eu-central-1) Default output format: json (recommendation)
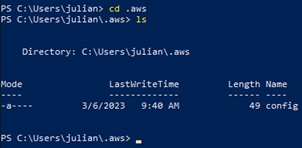
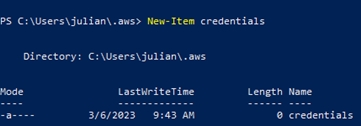
This will create a new directory called .aws that can be seen with the commands:
ls
cd .aws
ls
There will be a file “config” created, so we need to manually create a file called “credentials” with the command:
New-Item credentials
We will edit the file by typing the command:
notepad credentials
Which will open the text editor for us to put the following:
[default]
region = eu-central-1
output = json
[remote]
role_arn = arn:aws:iam::222222222222:role/AllowWSMAccess
credential_source = Ec2InstanceMetadata
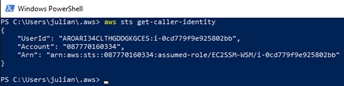
Verify role with command:
aws sts get-caller-identity
Finally, check the permissions on the local account by running command:
aws s3 ls
And remotely:
aws s3 ls ‑‑profile remote
If you receive a message that role could not be assumed, you need to verify the steps to assure that all is properly configured.
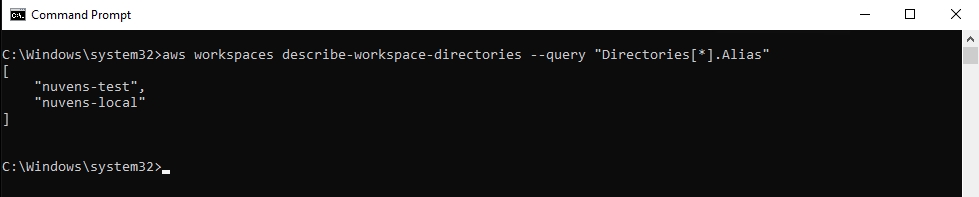
It is important to make sure that you also have visibility of Directories and networks on the remote account. Verify it by running the command:
aws workspaces describe-workspace-directories --query "Directories[*].Alias" --profile remote
Some other useful commands that can be helpful to verify that connection to remote AWS Accounts assuming roles are:
List WorkSpaces in a table format (please, use the right region):
aws workspaces describe-workspaces --region eu-central-1 --query "Workspaces[*].[WorkspaceId, UserName]" --profile remote --output table
List KMS keys ARNs:
aws kms list-keys --region eu-central-1 --query "Keys[*].KeyId" --profile remote --output table
Once enabled, an additional switch will become available in an Auto Provision (AP) profile. To access it, go to Configuration > AP Profiles, click on your desired profile, and you’ll see the new switch. This allows you to query the Entra group specified in the profile.

Amazon WorkSpace Password Expires Soon
Amazon WorkSpace Reboot Scheduled
Unused WorkSpace Reminder
Amazon WorkSpace New WorkSpace Created
The Email Reminders section allows administrators to configure automated reminder emails for unused WorkSpaces. These reminders help manage inactive resources and prompt users to take action before clean-up or deprovisioning.
You can create and customize multiple reminders by specifying:
The number of days a WorkSpace has been unused before the reminder is triggered (e.g. 30, 60, 90 days).
The content and subject of each email reminder, giving you full control over the messaging at each stage (e.g. first notice, follow-up, final warning).


Fixed Tag Values: These are pre-set tag values that are automatically applied to Amazon WorkSpaces when created or managed through WSM. Tags in AWS, consisting of key-value pairs, help with organizing and categorizing resources, simplifying cost tracking, resource management, and automation.
Use Custom KMS Keys: This option enhances security by encrypting Amazon WorkSpaces and related resources using your own encryption keys, rather than AWS-managed keys. It offers more control over key management, including rotation, access policies, and auditing.
To understand how to set up cost optimiser for Amazon WorkSpaces, please follow this external link WorkSpaces Cost Optimizer:
AWS Cost Optimizer: If this tool is installed, you can enable its reporting features in this section to track and optimize WorkSpaces costs. The CO tile on the Admin Dashboard provides a quick overview of the tool's status and the number of operating directories, helping you monitor performance and address any issues promptly.
Dry Run Mode: This feature allows you to simulate potential cost-saving actions without actually implementing them, providing insights into possible savings before making changes.
Cost Optimizer Bucket: Bucket name where Cost Optimizer data stored
Cost Optimizer Version: The version determines the filename used to store the data
You will see a summary of the Account ID(s) as they are added.
If you want to deploy Roles and Policies on a Multi-Account AWS Environment, you can also check our GitLab with code for Terraform and CloudFormation examples:
If the wrong version is selected for Cost Optimizer, cost optimization reports will not work. This does not however effect the functionality of the AWS Cost Optimizer.

Add a new profile in Configuration > AP Profiles and assign it the name of the Entra group you previously created. Fill in the required details for WorkSpace creation. Then, enable the Use Entra option and specify the number of days for temporary provisioning. Finally, click Save to complete the setup.
After adding users to the designated group in Microsoft Entra, the system will initiate provisioning automatically—please allow approximately 15 minutes, which is the default synchronization interval.


This information can be accessed by selecting a specific WorkSpace in the WorkSpaces section under the Admin tab. This will display a detailed overview of the WorkSpace and its associated user, including newly added metrics such as:
Created: The date the WorkSpace was provisioned.
Billing: Reflects the effectiveness of cost management. Clicking on this metric will take you directly to the Cost Optimization Report, where you can analyze detailed cost data and optimization opportunities.
Performance: Represents the operational efficiency of the WorkSpace. Clicking on this metric will take you to the Underprovisioned WorkSpaces Report, where you can review WorkSpaces that may require additional resources.
You will find essential WorkSpace controls at the bottom of your screen, including icons for Refresh, Stop, Reboot, Restore, and Rebuild.
From the dropdown menu at the top right, you will see a list of possible actions, depending on your per
RDP: If RDP is enabled in the Configurations > Settings > Remote Services menu, this will download an RDP file with the necessary details to connect to a user’s WorkSpace.
Note: RDP is not a session that shadows the user. It simply allows administrators to connect to a WorkSpace for support purposes
Copy MSRA to Clipboard: Copies the MRSA key to your clipboard. This key is typically used for authentication, encryption, or secure communication between systems. Once copied, you can paste it into a required field or document for further use, such as establishing a secure connection or verifying a device's identity.
For proper functionality of MSRA, an SSL certificate must be installed on the WSM appliance.
Terminate: Permanently deletes a WorkSpace, resulting in the loss of all data.
Schedule Termination: Schedules a WorkSpace termination at a specified date and time.
Change Type: Allows switching to a different instance type (can only be changed every 24 hours).
Change Mode: Switches between ALWAYS_ON and AUTO_STOP modes.
Change Reboot Hour: If "Auto Reboot" is enabled in Options > Settings, this allows you to set a specific reboot time for individual WorkSpaces. By default, WorkSpaces do not reboot automatically, but this option enables scheduling a reboot at a time that best suits your users.
Migrate: to migrate a user from one bundle to another.
Create Image: Captures a custom image of the current AWS Workspace.
Resend Welcome Email:
The Global Cookie Encryption feature is designed for customers deploying WorkSpaces Manager behind a load balancer with multiple instances. When enabled, this feature ensures consistent and secure user session handling across all instances by using a shared encryption key stored in AWS Systems Manager Parameter Store.
To support this functionality, the WSM instance role must be granted the following permissions:
{
      "Version": "2012-10-17",
      "Statement": [
            {
                  "Effect": "Allow",
                  "Action": [
                        "ssm:PutParameter",
                        "ssm:GetParameter",
                        "ssm:GetParameters",
                        "ssm:DeleteParameter"
                  ],
                  "Resource": "*"
            }
      ]
}WorkSpaces Manager can automatically change the compute type of a WorkSpace. This is useful, for instance, if a user is regularly running heavy spreadsheets on a Standard WorkSpace and would benefit from an upgrade to a Performance WorkSpace. It can also downgrade a WorkSpace if it has been over-provisioned for the user's day-to-day needs.
You must have the WorkSpaces Manager Performance agent installed for this to work.
You can set Low and High Processor and Memory values, according to your standards, without enabling the options. This would allow WorkSpaces Manager to run reports and recommendations for overutilized and underutilised WorkSpaces, without automatically changing them.
On the Admin Dashboard, if enabled, you will find a tile labeled Cost Optimizer: CO Directories. This tile provides confirmation of the system's status. If everything is functioning correctly, the status will indicate full operation. However, if an issue arises, it will display the specific number of directories running, such as "3/4" operational.
To identify the specific directory experiencing issues, navigate to the Support dropdown and select Configuration Status. In this section, under Directories, you will find details highlighting the directory that is not functioning properly.
The most likely cause of the issue is an incorrect S3 bucket name. To resolve this, navigate to Configuration > Settings > Active Directory under Forest Directories and ensure the S3 bucket name is accurate. Additionally, verify that the S3 bucket has been properly configured. For detailed guidance, refer to the AWS documentation.
Once the issue is resolved, the affected directory will turn green under
In the WorkSpaces Manager dashboard, go to the Users section. You will see an option for ‘Add User’.
Fill in the user's details on the left—including name, email, username, and password. On the right, under WorkSpace Options, select the Account, Region, Directory, Mode, and Bundle you want applied to this user’s WorkSpace.
Once all required fields are complete, click Save. A confirmation message will appear to indicate that the WorkSpace is now being provisioned.
The WorkSpace will take around 20-45 minutes to set up, depending on if it is to be encrypted. Nuvens always recommend encrypting both volumes. An email is automatically sent to the user with instructions on how to access their WorkSpace.


Change Volumes: Increases the size of the C:\ and D:\ volumes (cannot decrease size).
Change Protocol WSP: If a WorkSpace was initially created with the PCoIP protocol, the 'Change Protocol' option allows you to switch between PCoIP and Amazon's WSP protocol, with a limit of two switches within 24 hours. The change of protocol will initiate an instant reboot
Manage Tags: Adds tags to a WorkSpace.
On the Admin Dashboard, the CO tile will also update to reflect the current number of operating CO Directories.


This section lists all the WorkSpace bundles in the AWS account. The search feature allows you to filter the list, which is fully searchable by partial matches on any column's contents.
This report also shows how many of each bundle is deployed within the organisation.
You can brand the WorkSpaces Manager Portal and Sign In with your own company logo.
Whilst WSM will automatically resize your logo, 200Width x 50Height is the recommended size for upload.


The Rebuild function is applied to WorkSpaces associated with a selected bundle. A scheduled rebuild will occur one hour after the user’s selected Reboot Hour. This function rebuilds all WorkSpaces based on the selected bundle name, regardless of Account, Region, or Directory.
Example of a rebuild process:
Here we are going to rebuild all WorkSpaces in a bundle called "nuvens_bundle2024" tomorrow morning at 01:00. Some of our development users have installed applications of their own and have a tag set on their WorkSpace called "NoRebuild" that is set to value "True". These WorkSpaces will be omitted from the task.
Select "Schedule". You can, at this point, select to override the "NoRebuild" tag as mentioned above.
You will now see a screen confirming that the scheduled task has been submitted to the console.


WorkSpaces Manager can manage WorkSpaces within different AWS accounts from the same console.
Make a note of the following: • The account number of Account A (where your WorkSpaces Manager instance resides). For this example, we will refer to it as 111111111111 • The account number of Account B (where your other WorkSpaces reside that you want to manage). For this example, we will refer to it as 222222222222 • The IAM role that is associated with your WorkSpaces Manager in Account A. When deployed via CloudFormation, name can be similar to CF-WSM-WorkSpacesManagerRole-XXXXXXXXXXXX. If it is deployed manually, it may have a different name, per example, WSMRole-XXXXXX. • The Instance ID of your WorkSpaces Manager. For this example, we will refer to it as i-99999999999999999
1. Create a new IAM policy on master account (Account A or 111111111111), which will give access to the second account (Account B or 222222222222) and call it ‘WSMAllowRemoteAccessPolicy’. The content in JSON format will be:
2. On the master account, look for the Role/Instance Profile associated to the WSM EC2 instance and edit it to also include the new IAM Policy just created and called ‘WSMAllowRemoteAccessPolicy’.
1. Create a new IAM policy on second account (Account B or 222222222222), which will give access to WSM to some services. Call it ‘WSMPortalPolicy’. The content in JSON format will be:
2. Create a new IAM policy on second account (Account B or 222222222222), which will give access to WSM to assume a role remotely. Call it ‘WSMPortalIAMPolicy’. The content in JSON format will be:
3. Create a new IAM policy on second account (Account B or 222222222222), which will give access to WSM to assume a role remotely. Call it ‘WSMPortalS3Policy’. The content in JSON format will be:
4. Create an IAM role called ‘AllowWSMAccess’ for AWS Account subservice and attach the policies ‘WSMPortalPolicy’, ‘WSMPortalPolicy’ and ‘WSMPortalS3Policy’ that we created above
5. Go to the ‘AllowWSMAccess’ IAM role, select ‘Trust Relationships’ and then ‘Edit Trust Policy’. Insert this JSON and select ‘Update Policy’.
Configure the WorkSpaces Manager Portal to accept the new account. Go to Configuration > Settings > Amazon Web Services and set ‘Multiple account’ to ‘On’.
On the right hand side panel, you will now see a Add option with your root (Master) WorkSpaces Manager account already filled in.
To add Account B, select the ‘Add’. Enter the details for the AWS account. • AD Integrated – Your WorkSpaces can either be domain joined or non-domain joined. If they are domain joined, select this. • WorkSpaces – WorkSpaces are viewable and enabled in this account. Select this. • AWS Cost Optimiser – Select. • Cost Optimiser Bucket – This is the s3 bucket that represents the Cost Optimiser location on Account B. • Access Log Group – Leave blank here for now Leave AppStream option and AppStream Bucket
Your new account will show up as below. Up to 10 accounts can show on one list, and any more will be on the next page where you can select ‘Next’.
{
 “Version”: “2012-10-17”,
 “Statement”: [
  {
  “Sid”: “VisualEditor0”,
  “Effect”: “Allow”,
  “Action”: [
  “cloudwatch:DescribeAlarmsForMetric”,
  “cloudwatch:DescribeAlarmHistory”,
  “cloudwatch:DescribeAlarms”,
  “cloudwatch:Describe*”,
  “cloudwatch:GetDashboard”,
  “cloudwatch:GetMetricData”,
  “cloudwatch:GetMetricStatistics”,
  “cloudwatch:GetMetricWidgetImage”,
  “kms:ListKeys”,
  “kms:ListAliases”,
  “kms:DescribeKey”,
  “sts:AssumeRole”,
  “appstream:*”,
  “ce:*”,
  “pricing:*”,
  “workspaces:*”
 ],
 “Resource”: [
 ”*”,
 “arn:aws:iam::222222222222:role/AllowWSMAccess”
  ]
 }
 ]
}{
“Version”: “2012-10-17”,
“Statement”: [
{
“Sid”: “VisualEditor0”,
“Effect”: “Allow”,
“Action”: [
“cloudwatch:GetMetricData”,
“cloudwatch:DescribeAlarmHistory”,
“cloudwatch:DescribeAlarmsForMetric”,
“cloudwatch:GetMetricWidgetImage”,
“cloudwatch:GetDashboard”,
“cloudwatch:GetMetricStatistics”,
“cloudwatch:DescribeAlarms”,
“logs:*”,
“sts:GetAccessKeyInfo”,
“sts:GetSessionToken”,
“sts:GetServiceBearerToken”,
“sts:GetCallerIdentity”,
“ce:*”,
“kms:*”,
“pricing:*”,
“workspaces:*”
],
“Resource”: “*”
},
{
“Sid”: “VisualEditor1”,
“Effect”: “Allow”,
“Action”: [
“sts:AssumeRole”, “sts:GetFederationToken”
],
“Resource”: [
“arn:aws:iam::111111111111:role/CF-WSM-WorkSpacesManagerRole-XXXXXXXXXXXX”,
“arn:aws:iam::222222222222:role/AllowWSMAccess”
]
}
]
}{
“Version”: “2012-10-17”,
“Statement”: [
{
“Sid”: “VisualEditor0”,
“Effect”: “Allow”,
“Action”: [
“iam:GetRole”,
“iam:PassRole”,
“sts:AssumeRole”
],
“Resource”: [
“arn:aws:iam::111111111111:role/CF-WSM-WorkSpacesManagerRole-XXXXXXXXXXXX”,
“arn:aws:sts::111111111111:assumed-role/CF-WSM-WorkSpacesManagerRole-XXXXXXXXXXXX/i-99999999999999999”
]
}
]
}{
“Version”: “2012-10-17”,
“Statement”: [
{
“Sid”: “VisualEditor0”,
“Effect”: “Allow”,
“Action”: [
“s3:GetBucketVersioning”,
“s3:GetObject”,
“s3:ListAllMyBuckets”,
“s3:ListBucket”
],
“Resource”: “*”
},
{
“Sid”: “VisualEditor1”,
“Effect”: “Allow”,
“Action”: [
“sts:AssumeRole”,
“sts:GetFederationToken”
],
“Resource”: [
“arn:aws:iam::111111111111:role/CF-WSM-WorkSpacesManagerRole-XXXXXXXXXXXX”,
“arn:aws:iam::222222222222:role/AllowWSMAccess”
]
}
]
}{
“Version”: “2012-10-17”,
“Statement”: [
{
“Sid”: “VisualEditor0”,
“Effect”: “Allow”,
“Action”: [
“iam:GetRole”, “iam:PassRole”, “sts:AssumeRole”
],
“Resource”: [
“arn:aws:iam::111111111111:role/WSM320-YourWSMRole”,
“arn:aws:sts::111111111111:assumed-role/WSM320-YourWSMRole/i-99999999999999999”
]
}
]
}{
“Version”: “2008-10-17”,
“Statement”: [
{
“Effect”: “Allow”,
“Principal”: {
“AWS”: [
“arn:aws:iam::111111111111:root”,
“arn:aws:iam::111111111111:role/CF-WSM-WorkSpacesManagerRole-XXXXXXXXXXXX”,
“arn:aws:sts::111111111111:assumed-role/CF-WSM-WorkSpacesManagerRole-XXXXXXXXXXXX/i-99999999999999999”
],
“Service”: [ “workspaces.amazonaws.com”, “ec2.amazonaws.com”]
},
“Action”: “sts:AssumeRole”
}
]
}